Uninstall Docker Desktop on Mac Without Losing Volumes

Docker Desktop is not one app. It is a GUI, a background virtual machine, a set of
command-line tools linked into /usr/local/bin, and a disk image that quietly grows
to tens of gigabytes. Dragging it to the Trash removes the first of those and leaves
the rest.
It also has the opposite problem from most uninstalls: running the official uninstaller is the destructive step, not the cleanup afterwards. Here is the order that keeps your data, and how to tell the disposable leftovers from the ones you will want back.
Uninstalling destroys your containers, images, and volumes
Docker's uninstall documentation states this plainly: uninstalling Docker Desktop destroys containers, images, volumes, and other Docker data local to the machine. There is no undo and no Trash stage.
Most of that is rebuildable. Images pull again, containers rebuild from a Dockerfile. The exception is named volumes, which are where a local database keeps its data. A Postgres or MySQL container you have been developing against for months holds its rows in a volume, not in the image, and that volume is deleted with everything else.
Before anything else, list what exists:
docker volume ls
If a volume matters, back it up before you uninstall, not after. Stop processes writing to it before making a file-level archive; for a database, use its supported backup method or shut it down cleanly first. An archive of files being modified may be inconsistent:
docker run --rm -v <volume>:/from -v "$PWD":/to alpine \
  tar czf /to/<volume>.tgz -C /from .
The same applies to anything you built and never pushed. docker image ls shows what
is local; if it is not in a registry, it exists on this Mac only.
If space is the reason, you may not need to uninstall at all
Docker keeps everything inside one large virtual disk image, and that file is usually
the single biggest thing Docker owns. Pruning inside Docker often recovers what you
came for while leaving the tool installed, but pruning is not reversible.
Start with docker system df to see the split, then read
Clean Up Docker on Mac Without Losing Data, which
covers pruning and the reason the disk file does not shrink on its own.
If you are here to remove Docker for good, continue.
Use Docker's own uninstaller
Docker's documented uninstaller does more than delete the bundle. It unloads the background services and removes the command-line symlinks that a Finder drag leaves behind.
From the app: open Docker Desktop, select the Troubleshoot icon in the top right, choose Uninstall, and confirm. From Terminal:
/Applications/Docker.app/Contents/MacOS/uninstall
Then move Docker from Applications to the Trash.
Docker documents a specific operation not permitted error for its protected app-container
folder: in that case the uninstall can complete while the folder remains. This does not
mean every permission error is harmless. Check the exact path and the uninstall result;
Terminal needs Full Disk Access to access that protected folder.
What is left, and who owns it
After the uninstaller runs, some folders survive. Docker names two:
~/Library/Group Containers/group.com.docker
~/.docker
These are not the same kind of thing, and the difference is the whole point.
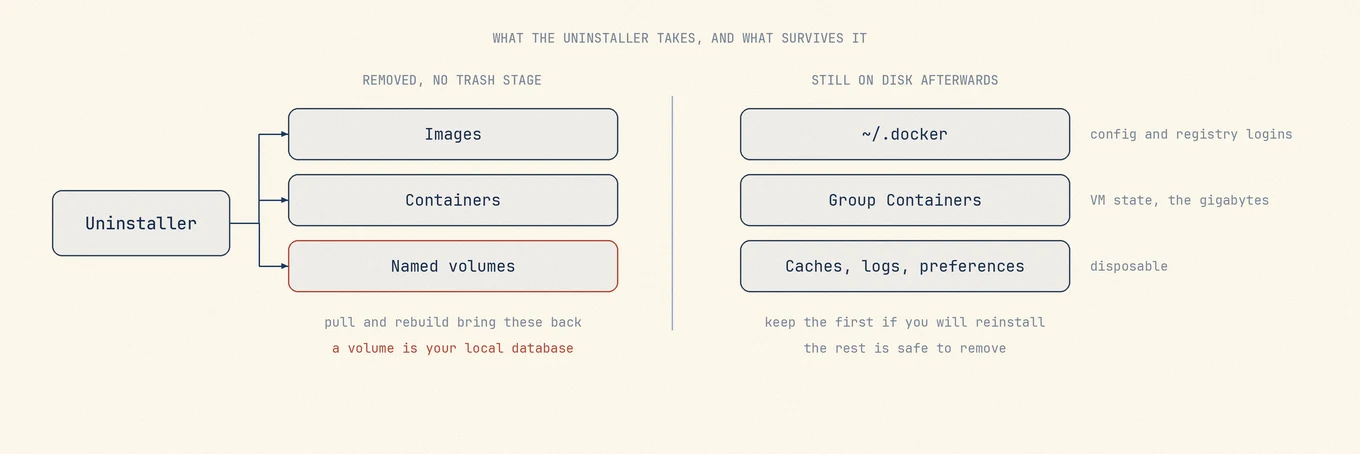
~/.docker is your configuration. It holds contexts, daemon settings, and registry
credentials from docker login. If you are reinstalling Docker later, or switching to
Colima, Rancher Desktop, or OrbStack, this is the folder you may want to keep. Deleting
it means logging back into every registry.
~/Library/Containers/com.docker.docker is the app's container folder. It holds the
virtual machine and its disk image, Docker.raw, so this is where the tens of gigabytes
are, and it is the protected folder from the operation not permitted case above.
~/Library/Group Containers/group.com.docker holds Docker Desktop's settings, not the
disk image. Once you have accepted that the containers and volumes are gone, these two
are the parts worth removing.
Beyond those two, Docker leaves the usual macOS trail: caches, logs, preferences, and
saved application state under your Library. These are disposable. The point is not to
delete every file with docker in the name, but to know which of them is a cache and
which is a credential.
Confirm it is actually gone
Two checks. First, that nothing is still running:
pgrep -fl -i docker
Second, that the command-line tools are unlinked:
which docker docker-compose
Both should return nothing. If docker still resolves, you likely have a Homebrew
copy of the CLI installed separately, which is a different package and survives Docker
Desktop's uninstaller by design. brew list | grep docker will tell you.
The faster way to see all of it at once
The manual route works, but it asks you to already know which paths exist and which of them is your data. That is the part guides usually skip, and it is the part that costs you something when it goes wrong.
Mole lists the related files it identifies before anything is removed, grouped so you can see what a folder actually is, with its size next to it. You review the set, uncheck what you want to keep, and what you remove goes to the Trash rather than disappearing. For Docker specifically, the disk image usually accounts for nearly all of the reclaimed space, and seeing that number before you commit is the difference between a cleanup and a surprise.
What comes back after a reinstall
Images can be pulled again if they still exist in a registry, and containers can be recreated if you kept their build and runtime configuration. Local-only images, changes inside a container, and named-volume data do not return automatically. Back up anything you cannot reproduce before uninstalling.
~/.docker contains client configuration and contexts, and may refer to credentials held
elsewhere, such as Keychain. Back up settings you need before removing it. Keeping the
folder does not guarantee that every login will survive; deleting it can lose more than a login session.
The virtual disk image is recreated empty. It grows back as you pull images
again, so the tens of gigabytes an uninstall reclaims are mostly temporary if you
reinstall and resume normal use. Keeping that number down long term is what
docker system prune is for, not a reinstall cycle.
What Mole lists for this app, and what it leaves alone, is in Uninstall Docker Desktop on Mac.