How to Completely Uninstall Apps on Mac Without Losing Data

For a simple, self-contained app, the safe quick path is short:
- Save your work and quit the app.
- Open Finder › Applications.
- Select the app and choose File › Move to Trash, or drag it to Trash.
- Leave it in Trash while you check that related apps, files, devices, and sync still work. Empty Trash only after that verification window.
That removes many ordinary apps. It is not the right first move for software that installed a vendor uninstaller, background service, driver, system extension, shared container, or licensing component. A complete uninstall is not a hunt for every file that resembles the vendor name. It is a controlled removal of the app and data it actually owns, while preserving documents and resources shared with other apps.
Decide first: Finder or the vendor uninstaller?
Before moving anything, open the app's Help or settings, check its installer, and search the vendor's support site for uninstall instructions. Use the vendor workflow when the app is a VPN, antivirus tool, audio driver, virtualization product, cloud-sync client, input-device utility, license manager, or anything that added a system extension or privileged helper.
Apple's app removal guide recommends an app's own uninstaller when one exists because it knows about login items, extensions, caches, and support data that Finder does not. A vendor workflow can deactivate an extension, unload a service, release a device, or update another component in the required order. Do not replace those steps with guessed file deletion.
Use the Finder quick path when the app is clearly a standalone bundle and the vendor provides no uninstaller. If you are unsure, preserve the app and its data until you have checked the documentation.
If macOS says the app is in use
Do not start deleting helpers around a running app. First quit it normally so it can save state and close databases. If it does not respond, open Apple menu › Force Quit, select the app, and choose Force Quit. Apple warns that force quitting can lose unsaved changes. You can also inspect the app and its named processes in Activity Monitor before stopping them.
If Finder still reports that the app is in use, restart the Mac and try again before reopening it. If the same message returns, Apple's Finder removal instructions recommend trying Safe Mode. Persistent helpers are also a sign to look again for a vendor uninstaller instead of guessing which process or launch item to remove.
Deleting the app is separate from documents and subscriptions
Removing an app does not delete documents you created with it. Projects may be in Documents, iCloud Drive, an external disk, a synced workspace, or a custom folder. Conversely, files inside an app-specific support folder may include profiles, messages, downloads, virtual machines, or databases that you do want to preserve. Export unique data and confirm a current backup before cleanup.
Deleting an app also does not cancel a subscription. For an App Store subscription, open the App Store, choose your name, open Account Settings, scroll to Subscriptions, choose Manage, then edit and cancel the subscription. Apple's subscription guide covers that separate process. Subscriptions purchased from a vendor must be managed with that vendor.
The app bundle is only one layer
A macOS .app is a bundle containing the program and its packaged resources. Apps
can also create preferences, caches, support data, containers, logs, login items, and
extensions elsewhere. Deleting the bundle removes the executable you launched, but
not necessarily those other layers.
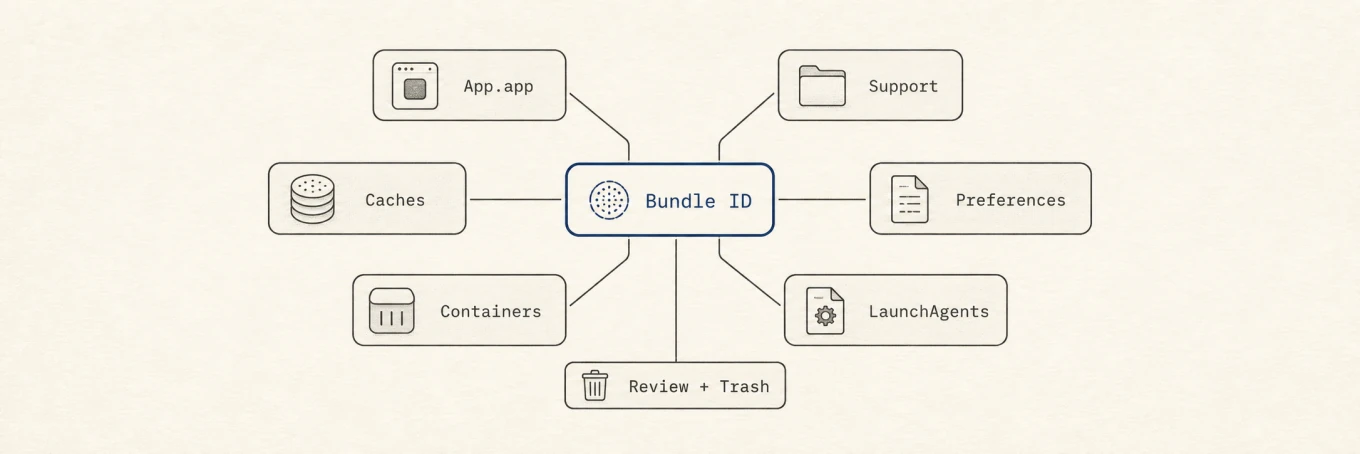
For a small utility, leftovers may be a few harmless preferences. A browser, game, developer tool, or media app can leave gigabytes. Size does not tell you whether a folder is disposable cache or irreplaceable user data.
Know the Library locations, but do not delete by location alone
The user Library is hidden in Finder. Hold Option while opening the Go menu to
reveal Library, or choose Go › Go to Folder and enter ~/Library. Apple
documents both methods in its Finder path guide.
Common per-user locations include:
~/Library/Application Support/: databases, profiles, downloaded assets, plug-ins, and other primary app data.~/Library/Caches/: rebuildable data, although a filename still does not prove ownership.~/Library/Preferences/: settings, commonly stored as property lists.~/Library/Containers/: sandboxed data for one app or extension.~/Library/Group Containers/: data shared by several apps or extensions from a developer.~/Library/HTTPStorages/: website and network storage used by some apps.~/Library/Logs/: diagnostic logs.~/Library/Saved Application State/: window and restoration state.~/Library/LaunchAgents/: per-user background jobs.
Similar top-level paths under /Library are system-wide and may affect every user.
They are more likely to contain privileged helpers, launch daemons, drivers, or shared
vendor components. Do not browse those folders and remove name matches. Use the
vendor's documented uninstaller or qualified support.
Group containers need special care. Apple's App Group documentation explains that multiple apps and supporting processes from the same developer can share one container. Never remove a group container until you have identified every participating app and extension and decided what should happen to their shared data.
Use the bundle identifier as evidence
The display name is a weak clue. An app's bundle identifier is the stronger
identity, typically a reverse-DNS string such as com.spotify.client. Apple defines
CFBundleIdentifier as the identifier used to distinguish a bundle from others. Read
it before moving the app to Trash:
osascript -e 'id of app "Spotify"'
mdls -name kMDItemCFBundleIdentifier -r /Applications/Spotify.app
You can then perform a read-only candidate search inside your user Library:
find ~/Library -maxdepth 4 \( -iname "*spotify*" -o -iname "*com.spotify*" \) -print 2>/dev/null
Search output is not a deletion plan. A display-name match may belong to a document, a different product, or shared vendor data. Even an exact bundle-ID match needs a content and ownership review. Ask:
- Does the path contain a cache, or unique documents and databases?
- Does its metadata or contents identify the exact app?
- Is it a shared group container or vendor component used by another installed app?
- Would keeping it make a later reinstall safer, and is the space worth reclaiming?
If you cannot answer those questions, leave the path alone. A few preference files are usually less costly than deleting the wrong data.
Review login items and extensions
Open Apple menu › System Settings › General › Login Items & Extensions. Review Open at Login, background activity, and the extension categories. Apple's settings guide explains the current controls.
Turning off a stale login item can help verify that no wanted workflow depends on it, but it is not a substitute for a vendor uninstall. System extensions and drivers have their own activation lifecycle. Apple's system extension documentation gives the containing app a deactivation path and notes that a restart can be required. Let the vendor workflow perform that teardown.
Do not infer a launch service's owner from a plist filename or unload arbitrary jobs. A helper can be shared, and removing its file before it is deactivated can leave a broken service registration.
A careful manual sequence
- Identify the exact app, developer, bundle identifier, version, and install source.
- Export unique data, confirm a backup, and handle subscription or device deauthorization separately.
- Use the vendor uninstaller if the software has extensions, drivers, helpers, licensing state, or a documented removal workflow.
- Otherwise quit the app and move its bundle from Applications to Trash.
- Review exact per-user candidates by bundle identity and data type. Preserve documents, profiles, databases, plug-ins, and shared containers unless ownership and intent are clear.
- Review Login Items & Extensions. Disable a stale ordinary login item for testing, but return to the vendor workflow for system-integrated components.
- Restart if the vendor requests it or if a process remains in use. Test associated apps, file types, devices, browser extensions, and sync.
- Keep the removal in Trash through that verification window. If something was removed by mistake, select it in Trash and choose File › Put Back.
- Empty Trash only when you are satisfied. Apple's Trash guide notes that emptying Trash permanently deletes its contents.
Use the guide for the product you installed
Complex products differ enough that a generic checklist should not replace their specific sequence:
- Uninstall Google Chrome on Mac for profiles, browser data, and update components.
- Uninstall Docker Desktop on Mac for containers, images, command-line links, and privileged components.
- Uninstall Adobe Creative Cloud on Mac for shared Adobe services and the vendor's uninstall tools.
- Uninstall Microsoft Office on Mac for suite-wide containers, templates, and identity data.
- Uninstall Homebrew on Mac for packages, prefixes, and shell configuration outside an app bundle.
A review tool can reduce searching, not remove judgment

A dedicated uninstaller can resolve the bundle identifier and collect likely Library matches. Mole shows candidates and sizes before removal, validates paths, and uses Trash for ordinary files. That reduces manual searching, but it does not override a vendor uninstaller or prove that shared data is disposable. Review remains part of the uninstall.
Under the hood: discovery must not become deletion
The CLI and native app use separate implementations, but both divide the job into discovery, review, and confirmed execution. The sequence below follows the native app's path.
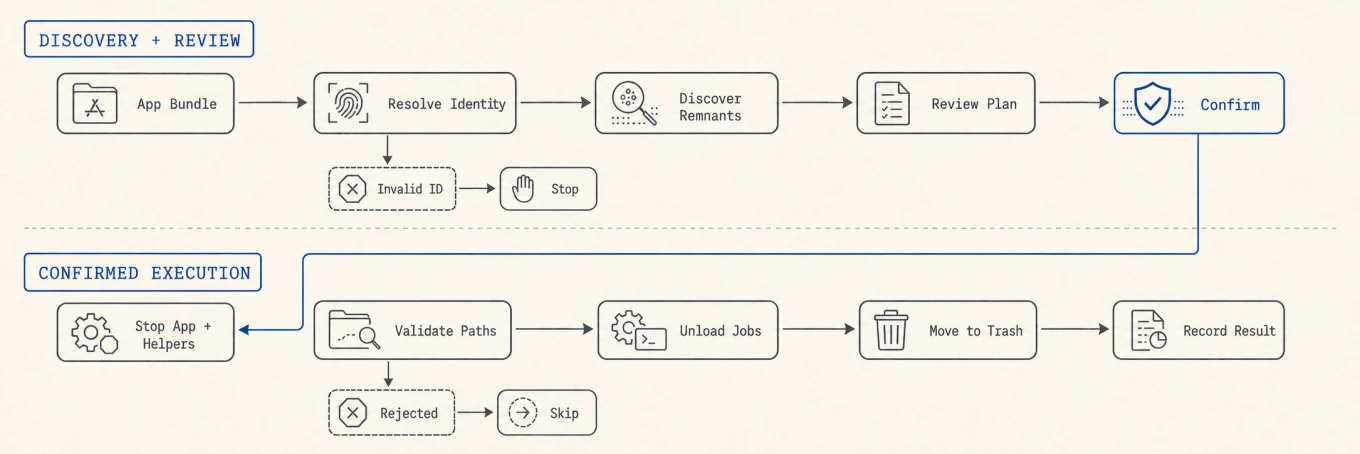
The bundle identifier is accepted only in reverse-DNS form before it can drive
bundle-derived matching, so malformed input cannot broaden a search pattern. The
scanner reads embedded login-item identifiers from Info.plist files instead of
guessing from filenames. After approval, the app quits the target and stops exact
helpers. A launch item is unloaded only after the path guard approves it, and every
URL is validated again before the Trash layer receives it. Missing, protected, or
rejected paths become explicit skips rather than silent partial deletion.
That architecture enforces the same rule a careful manual uninstall should follow: finding a path creates a candidate, not permission to remove it.
The safe rule to remember
Use the vendor uninstaller for system-integrated software. For a simple app, quit it, move the bundle to Trash, then review exact remnants by identity and data type. Preserve documents, databases, and shared containers until ownership is proven. Verify the Mac before emptying Trash, and treat subscriptions as a separate account task. Completeness matters, but recoverability and evidence matter more.